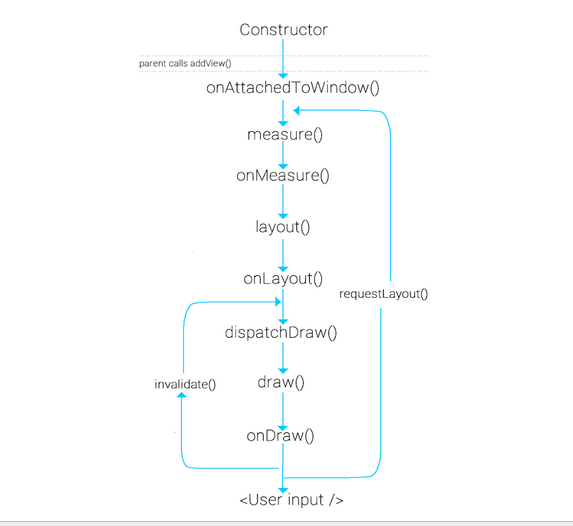
绘制是从 ViewRootImpl#performTraversals() 方法开始,从上到下遍历整个视图树,完成测量(Measure)、布局(Layout)和绘制(Draw)的过程。
源码基于 SDK 30(Android 11.0/R)
LayoutParams LayoutParams 用来告知父 View 怎么排列它们。用来指定 View 的宽高、内间距和外间距等信息。
1 2 3 4 5 6 7 8 9 10 11 12 13 14 15 16 17 18 19 20 21 22 23 24 25 26 27 28 29 public static class LayoutParams { @Deprecated public static final int FILL_PARENT = -1 ; public static final int MATCH_PARENT = -1 ; public static final int WRAP_CONTENT = -2 ; public int width; public int height; } public static class MarginLayoutParams extends ViewGroup .LayoutParams { public int leftMargin; public int topMargin; public int rightMargin; public int bottomMargin; private int startMargin = DEFAULT_MARGIN_RELATIVE; private int endMargin = DEFAULT_MARGIN_RELATIVE; public static final int DEFAULT_MARGIN_RELATIVE = Integer.MIN_VALUE; }
ViewGroup 的子类可以扩展 LayoutParams,以实现具体的布局特性。
1
2
3
4
5
6
7
8
9
10
11
12
13
14
public class FrameLayout extends ViewGroup { public static class LayoutParams extends MarginLayoutParams { public static final int UNSPECIFIED_GRAVITY = -1 ; public int gravity = UNSPECIFIED_GRAVITY; } } public class LinearLayout extends ViewGroup { public static class LayoutParams extends ViewGroup .MarginLayoutParams { public float weight; public int gravity = -1 ; } }
MeasureSpec MeasureSpec 叫做“测量规格”或“测量参数”,由测量模式和尺寸大小组成,封装了父 View 对子 View 的布局要求。父 View 根据自己的 MeasureSpec 和子 View 的 LayoutParams,计算出合适的 MeasureSpec,传递给子 View。
MeasureSpec 代表一个 32 位 的 int 值,高 2 位代表 SpecMode,低 30 位代表 SpecSize。通过 MeasureSpec.makeMeasureSpec(size, mode) 方法打包生成新的 MeasureSpec。
测量模式有如下三种:
EXACTLY :父视图为子视图指定一个确切的值,无论子视图期望多大,改尺寸也不会变化,对应的属性为 match_parent 或具体值。
AT_MOST :父视图为子视图指定一个最大尺寸,对应的属性为 wrap_content。这种模式下,父控件规定了子 View 的最大尺寸,只能由子控件自己根据需求去计算自己的尺寸,这种模式就是我们自定义视图需要实现测量逻辑的情况。
UNSPECIFIED :父视图对子视图没有任何约束,它可以达到所期望的任意尺寸。比如 ListView、ScrollView,一般自定义 View 中用不到。
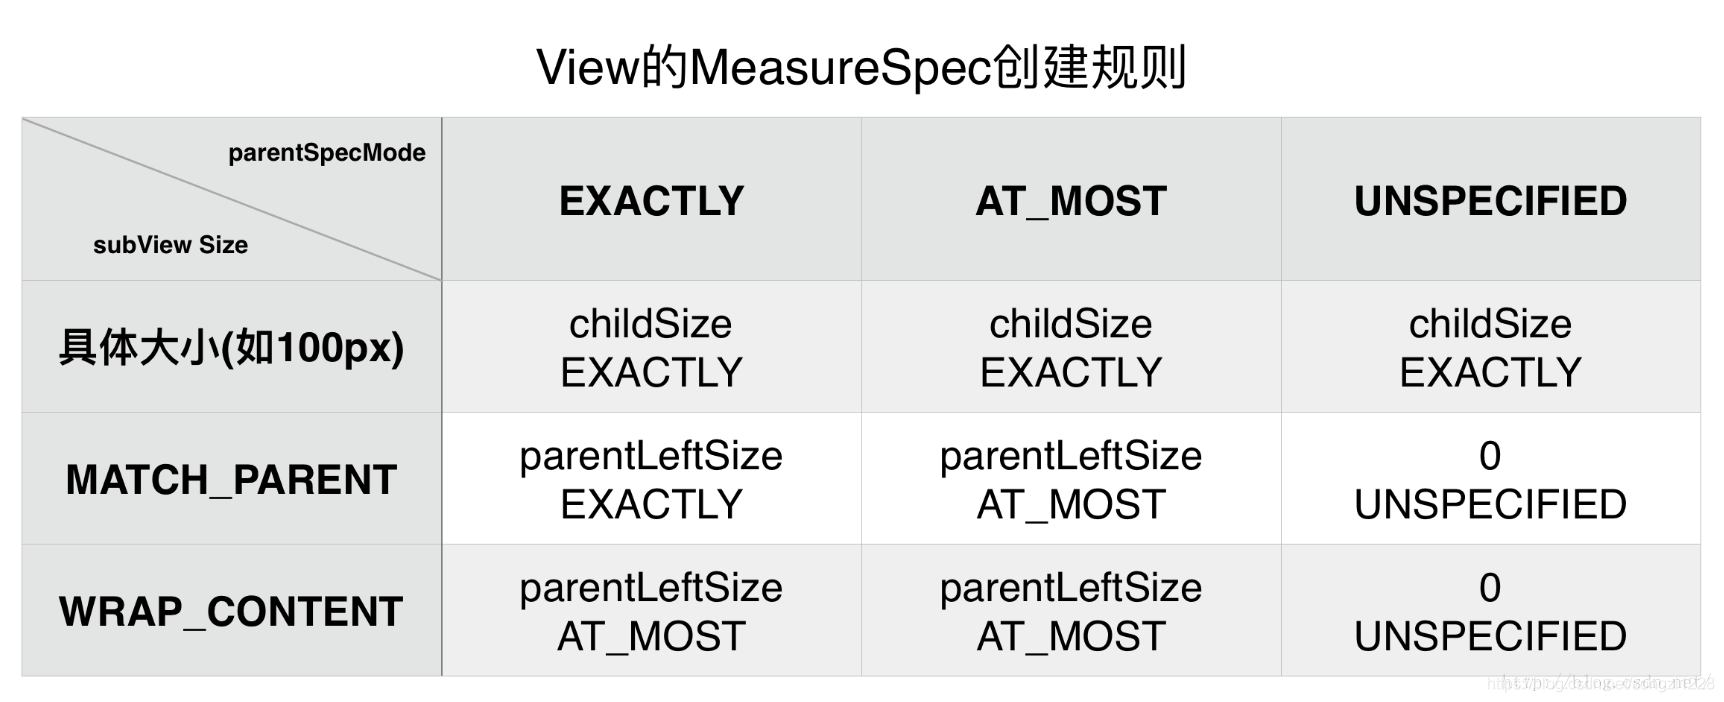
普通 View 的 MeasureSpec 生成规则:
View 是固定宽高时,不管父容器的 MeasureSpec 是什么,View 的 MeasureSpec 都是 EXACTLY + LayoutParams 的大小。
View 是 wrap_content 时,不管父容器的模式是 EXACTLY 还是 AT_MOST,View 的模式总是 AT_MOST + parentSize。
View 是 match_parent 时:
如果父容器是 EXACTLY,那么 View 是 EXACTLY + parentSize;
如果父容器是 AT_MOST,那么 View 是 AT_MOST + parentSize;
源码如下:
1 2 3 4 5 6 7 8 9 10 11 12 13 14 15 16 17 18 19 20 21 22 23 24 25 26 27 28 29 30 31 32 33 34 35 36 37 38 39 40 41 42 43 44 45 46 47 48 49 50 51 52 53 54 55 56 57 58 59 60 61 62 63 64 65 66 67 68 69 public static int getChildMeasureSpec (int spec, int padding, int childDimension) { int specMode = MeasureSpec.getMode(spec); int specSize = MeasureSpec.getSize(spec); int size = Math.max(0 , specSize - padding); int resultSize = 0 ; int resultMode = 0 ; switch (specMode) { case MeasureSpec.EXACTLY: if (childDimension >= 0 ) { resultSize = childDimension; resultMode = MeasureSpec.EXACTLY; } else if (childDimension == LayoutParams.MATCH_PARENT) { resultSize = size; resultMode = MeasureSpec.EXACTLY; } else if (childDimension == LayoutParams.WRAP_CONTENT) { resultSize = size; resultMode = MeasureSpec.AT_MOST; } break ; case MeasureSpec.AT_MOST: if (childDimension >= 0 ) { resultSize = childDimension; resultMode = MeasureSpec.EXACTLY; } else if (childDimension == LayoutParams.MATCH_PARENT) { resultSize = size; resultMode = MeasureSpec.AT_MOST; } else if (childDimension == LayoutParams.WRAP_CONTENT) { resultSize = size; resultMode = MeasureSpec.AT_MOST; } break ; case MeasureSpec.UNSPECIFIED: if (childDimension >= 0 ) { resultSize = childDimension; resultMode = MeasureSpec.EXACTLY; } else if (childDimension == LayoutParams.MATCH_PARENT) { resultSize = View.sUseZeroUnspecifiedMeasureSpec ? 0 : size; resultMode = MeasureSpec.UNSPECIFIED; } else if (childDimension == LayoutParams.WRAP_CONTENT) { resultSize = View.sUseZeroUnspecifiedMeasureSpec ? 0 : size; resultMode = MeasureSpec.UNSPECIFIED; } break ; } return MeasureSpec.makeMeasureSpec(resultSize, resultMode); }
生成 DecorView 的 MeasureSpec:
1 2 3 4 5 6 7 8 9 10 11 12 13 14 15 16 17 18 19 20 21 22 23 24 25 26 27 28 29 30 31 32 33 34 35 36 private void performTraversals () { Rect frame = mWinFrame; desiredWindowWidth = frame.width(); desiredWindowHeight = frame.height(); windowSizeMayChange |= measureHierarchy(host, lp, res, desiredWindowWidth, desiredWindowHeight); } private boolean measureHierarchy (final View host, final WindowManager.LayoutParams lp, final Resources res, final int desiredWindowWidth, final int desiredWindowHeight) { childWidthMeasureSpec = getRootMeasureSpec(baseSize, lp.width); childHeightMeasureSpec = getRootMeasureSpec(desiredWindowHeight, lp.height); performMeasure(childWidthMeasureSpec, childHeightMeasureSpec); } private static int getRootMeasureSpec (int windowSize, int rootDimension) { int measureSpec; switch (rootDimension) { case ViewGroup.LayoutParams.MATCH_PARENT: measureSpec = MeasureSpec.makeMeasureSpec(windowSize, MeasureSpec.EXACTLY); break ; case ViewGroup.LayoutParams.WRAP_CONTENT: measureSpec = MeasureSpec.makeMeasureSpec(windowSize, MeasureSpec.AT_MOST); break ; default : measureSpec = MeasureSpec.makeMeasureSpec(rootDimension, MeasureSpec.EXACTLY); break ; } return measureSpec; }
DecorView 初始化 DecorView 是整个页面的根 View,它是一个 FrameLayout。View 结构如下:
1
2
3
4
5
6
7
8
9
10
DecorView(Fragment) |-- LinearLayout |-- ViewStub{android:id/action_mode_bar_stub} |-- FrameLayout |-- FitWindowsLinearLayout{app:id/action_bar_root} |-- ViewStubCompat{app:id/action_mode_bar_stub} |-- ContentFrameLayout{android:id/content} |-- ContentView |-- View{android:id/navigationBarBackground} |-- View{android:id/statusBarBackground}
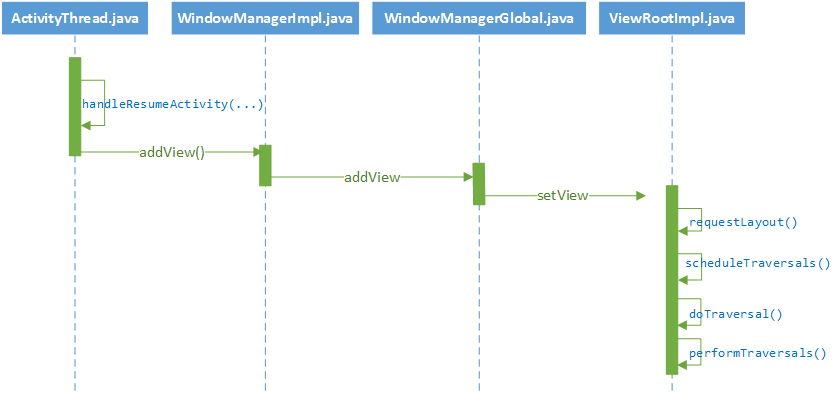
DecorView 是在 ActivityTherad#handleResumeActivity() 方法中创建。
1
2
3
4
5
6
7
8
9
10
11
12
13
14
15
16
17
18
19
20
21
22
23
24
25
26
27
28
29
30
31
32
33
34
35
36
37
38
39
40
public final class ActivityThread extends ClientTransactionHandler { @Override public void handleResumeActivity (IBinder token, ...) { final ActivityClientRecord r = performResumeActivity(token,...); final Activity a = r.activity; if (r.window == null && !a.mFinished && willBeVisible) { r.window = r.activity.getWindow(); View decor = r.window.getDecorView(); decor.setVisibility(View.INVISIBLE); ViewManager wm = a.getWindowManager(); WindowManager.LayoutParams l = r.window.getAttributes(); a.mDecor = decor; l.type = WindowManager.LayoutParams.TYPE_BASE_APPLICATION; if (a.mVisibleFromClient) { if (!a.mWindowAdded) { a.mWindowAdded = true ; wm.addView(decor, l); } } } if (!r.activity.mFinished && willBeVisible && r.activity.mDecor != null && !r.hideForNow) { if (r.activity.mVisibleFromClient) { r.activity.makeVisible(); } } } } public final class WindowManagerGlobal { public void addView (View view, ViewGroup.LayoutParams params,...) { ViewRootImpl root = new ViewRootImpl (view.getContext(), display); root.setView(view, wparams, panelParentView, userId); } }
Activity 创建成功后在 ActivityTherad#handleResumeActivity() 方法中创建 DecoreView;
通过 WindowManagerGlobal 添加 View;
执行 ViewRootImpl#setView() 发起绘制流程。
ViewRootImpl 发起 View 绘制 ViewRootImpl 在整个 View 体系中起着中流砥柱的作用,它是控件树正常运作的动力所在,作用如下:
连接 WindowManager 和 DecorView 的纽带;
向 DecorView 派发输入事件;
完成 View 的绘制;
负责与 WMS 交互通讯,调整窗口大小及布局。
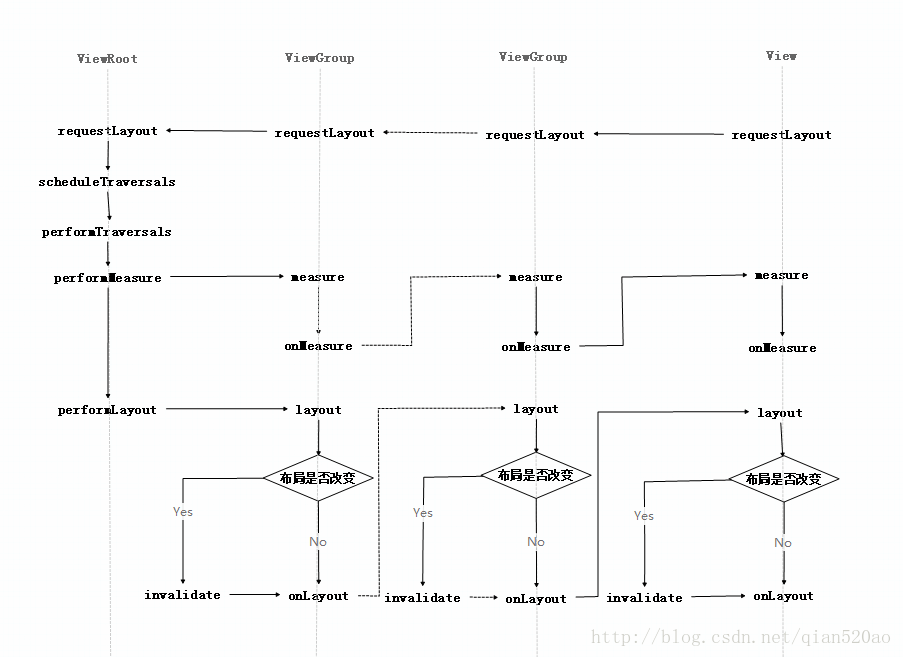
ViewRootImpl 中接收的各种变化,如来自 WMS 的窗口属性变化、来自控件树的尺寸变化及重绘请求等都触发 performTraversals() 方法,该方法中调用 performMeasure()、performLayout() 和 performDraw() 方法对 View 树进行测量、布局和重绘工作,并间接回调 View 及其子类的 onMeasure()、onLayout()和onDraw() 方法,完成一次遍历操作。
1
2
3
4
5
6
7
8
9
10
11
12
13
14
15
16
17
18
19
20
21
22
23
24
25
26
27
28
29
30
31
32
33
34
35
36
37
38
39
40
41
42
43
44
45
46
47
48
49
50
51
52
53
54
55
56
57
58
59
60
61
62
63
64
65
66
67
68
69
70
71
72
73
74
75
76
77
78
79
80
81
82
83
84
85
public final class ViewRootImpl implements ViewParent ...{ boolean mFirst; public boolean mTraversalScheduled; View mView; public ViewRootImpl (Context context, ...) { mFirst = true ; } public void setView (View view, WindowManager.LayoutParams attrs, ...) { mView = view; requestLayout(); int res = mWindowSession.addToDisplayAsUser(mWindow, ...); view.assignParent(this ); } void checkThread () { if (mThread != Thread.currentThread()) { throw new CalledFromWrongThreadException ( "Only the original thread that created a view hierarchy can touch its views." ); } } @Override public void requestLayout () { if (!mHandlingLayoutInLayoutRequest) { checkThread(); mLayoutRequested = true ; scheduleTraversals(); } } void scheduleTraversals () { if (!mTraversalScheduled) { mTraversalScheduled = true ; mTraversalBarrier = mHandler.getLooper().getQueue().postSyncBarrier(); mChoreographer.postCallback( Choreographer.CALLBACK_TRAVERSAL, mTraversalRunnable, null ); } } final TraversalRunnable mTraversalRunnable = new TraversalRunnable (); final class TraversalRunnable implements Runnable { @Override public void run () { doTraversal(); } } void doTraversal () { if (mTraversalScheduled) { mTraversalScheduled = false ; mHandler.getLooper().getQueue().removeSyncBarrier(mTraversalBarrier); performTraversals(); } } public final WindowManager.LayoutParams mWindowAttributes = new WindowManager .LayoutParams(); private void performTraversals () { WindowManager.LayoutParams lp = mWindowAttributes; boolean layoutRequested = mLayoutRequested && (!mStopped || mReportNextDraw); if (layoutRequested) { windowSizeMayChange |= measureHierarchy(host, lp, res, desiredWindowWidth, desiredWindowHeight); } final boolean didLayout = layoutRequested && (!mStopped || mReportNextDraw); if (didLayout) { performLayout(lp, mWidth, mHeight); } boolean cancelDraw = mAttachInfo.mTreeObserver.dispatchOnPreDraw() || !isViewVisible; if (!cancelDraw && !newSurface) { performDraw(); } } }
setView() 方法中scheduleTraversals() 方法中,通过 mHandler 发送一个 Runnable,在 run() 方法中去处理绘制流程,这一点和 ActivityThread 的 H 类相似,因为 ViewRootImpl 中 W 类是 Binder 的 Native 端,用来接收 WMS 处理操作,因为 W 类的接收方法是在线程池中的,所以需要 Handler 将事件处理切换到主线程中。
从 ViewRootImpl#performTraversals() 开始 View 树的绘制,调用 performMeasure()、performLayout() 和 performDraw() 方法。
measure 过程 measure 过程的主要是对 View 树中的每个 View 对 mMeasuredWidth 和 mMeasuredHeight 进行赋值,一旦这两个变量被赋值,则意味着该 View 的测量工作结束。
View#measure(int widthMeasureSpec, int heightMeasureSpec) 用于测量一个 View,该方法为 final 类型,不能重写。方法内部调用 onMeasure() 方法,供子类重写。而且不同的子 View 有不同的测量方法,如 FrameLayout,LinearLayout 和 RelativeLayout 都重写了 onMeasure() 方法。
在 measure() 方法返回前,一定要调用 setMeasuredDimension(int measuredWidth, int measuredHeight) 方法保存测量后的 mMeasuredWidth 和 mMeasuredHeight。方法最后会检查 PFLAG_MEASURED_DIMENSION_SET 标志位,没有设置会抛出 IllegalStateException 异常。
1 2 3 4 5 6 7 8 9 10 11 12 13 14 15 16 17 18 19 20 21 22 23 24 25 26 27 28 29 30 31 32 33 34 35 36 37 38 39 40 41 private void performTraversals () { WindowManager.LayoutParams lp = mWindowAttributes; int desiredWindowWidth; int desiredWindowHeight; Rect frame = mWinFrame; if (mFirst) { mLayoutRequested = true ; if (shouldUseDisplaySize(lp)) { } else { desiredWindowWidth = frame.width(); desiredWindowHeight = frame.height(); } boolean layoutRequested = mLayoutRequested && (!mStopped || mReportNextDraw); if (layoutRequested) { windowSizeMayChange |= measureHierarchy(host, lp, res, desiredWindowWidth, desiredWindowHeight); } } } private boolean measureHierarchy (final View host, final WindowManager.LayoutParams lp, final Resources res, final int desiredWindowWidth, final int desiredWindowHeight) { if (lp.width == ViewGroup.LayoutParams.WRAP_CONTENT) {} if (!goodMeasure) { childWidthMeasureSpec = getRootMeasureSpec(desiredWindowWidth, lp.width); childHeightMeasureSpec = getRootMeasureSpec(desiredWindowHeight, lp.height); performMeasure(childWidthMeasureSpec, childHeightMeasureSpec); } } private void performMeasure (int childWidthMeasureSpec, int childHeightMeasureSpec) { mView.measure(childWidthMeasureSpec, childHeightMeasureSpec); }
measure() 是 final 方法,只会调用 View#measure()。
1 2 3 4 5 6 7 8 9 10 11 12 13 14 15 16 17 18 19 20 21 22 23 24 public final void measure (int widthMeasureSpec, int heightMeasureSpec) { final boolean forceLayout = (mPrivateFlags & PFLAG_FORCE_LAYOUT) == PFLAG_FORCE_LAYOUT; final boolean specChanged = ...; final boolean isSpecExactly = ...; final boolean matchesSpecSize = ...; final boolean needsLayout = specChanged && (sAlwaysRemeasureExactly || !isSpecExactly || !matchesSpecSize); if (forceLayout || needsLayout) { int cacheIndex = forceLayout ? -1 : mMeasureCache.indexOfKey(key); if (cacheIndex < 0 || sIgnoreMeasureCache) { onMeasure(widthMeasureSpec, heightMeasureSpec); } } mMeasureCache.put(key, ...); }
DecorView 重写了 onMeasure() 方法。
1
2
3
4
5
6
7
8
9
10
@Override protected void onMeasure (int widthMeasureSpec, int heightMeasureSpec) { final int widthMode = getMode(widthMeasureSpec); final int heightMode = getMode(heightMeasureSpec); if (widthMode == AT_MOST) {} if (heightMode == AT_MOST) {} super .onMeasure(widthMeasureSpec, heightMeasureSpec); }
DecoreView 继承了 FrameLayout,会执行 FrameLayout#onMeasure() 方法。
1 2 3 4 5 6 7 8 9 10 11 12 13 14 15 16 @Override protected void onMeasure (int widthMeasureSpec, int heightMeasureSpec) { int count = getChildCount(); for (int i = 0 ; i < count; i++) { final View child = getChildAt(i); if (mMeasureAllChildren || child.getVisibility() != GONE) { measureChildWithMargins(child, widthMeasureSpec, 0 , heightMeasureSpec, 0 ); } } setMeasuredDimension(resolveSizeAndState(maxWidth, widthMeasureSpec, childState), resolveSizeAndState(maxHeight, heightMeasureSpec, childState << MEASURED_HEIGHT_STATE_SHIFT)); }
measureChildWithMargins() 是 ViewGroup 中的公共方法。
1 2 3 4 5 6 7 8 9 10 11 12 13 14 15 16 protected void measureChildWithMargins (View child, int parentWidthMeasureSpec, int widthUsed, int parentHeightMeasureSpec, int heightUsed) { final MarginLayoutParams lp = (MarginLayoutParams) child.getLayoutParams(); final int childWidthMeasureSpec = getChildMeasureSpec(parentWidthMeasureSpec, mPaddingLeft + mPaddingRight + lp.leftMargin + lp.rightMargin + widthUsed, lp.width); final int childHeightMeasureSpec = getChildMeasureSpec(parentHeightMeasureSpec, mPaddingTop + mPaddingBottom + lp.topMargin + lp.bottomMargin + heightUsed, lp.height); child.measure(childWidthMeasureSpec, childHeightMeasureSpec); }
1 2 3 4 5 6 7 8 9 10 11 12 13 14 15 16 17 18 19 20 21 22 23 24 25 26 27 28 29 30 31 32 33 34 35 36 37 38 39 40 41 42 43 44 45 46 47 48 49 50 public final void measure (int widthMeasureSpec, int heightMeasureSpec) { onMeasure(widthMeasureSpec, heightMeasureSpec); } protected void onMeasure (int widthMeasureSpec, int heightMeasureSpec) { setMeasuredDimension(getDefaultSize(getSuggestedMinimumWidth(), widthMeasureSpec), getDefaultSize(getSuggestedMinimumHeight(), heightMeasureSpec)); } protected final void setMeasuredDimension (int measuredWidth, int measuredHeight) { boolean optical = isLayoutModeOptical(this ); if (optical != isLayoutModeOptical(mParent)) { Insets insets = getOpticalInsets(); int opticalWidth = insets.left + insets.right; int opticalHeight = insets.top + insets.bottom; measuredWidth += optical ? opticalWidth : -opticalWidth; measuredHeight += optical ? opticalHeight : -opticalHeight; } setMeasuredDimensionRaw(measuredWidth, measuredHeight); } private void setMeasuredDimensionRaw (int measuredWidth, int measuredHeight) { mMeasuredWidth = measuredWidth; mMeasuredHeight = measuredHeight; mPrivateFlags |= PFLAG_MEASURED_DIMENSION_SET; } public static int getDefaultSize (int size, int measureSpec) { int result = size; int specMode = MeasureSpec.getMode(measureSpec); int specSize = MeasureSpec.getSize(measureSpec); switch (specMode) { case MeasureSpec.UNSPECIFIED: result = size; break ; case MeasureSpec.AT_MOST: case MeasureSpec.EXACTLY: result = specSize; break ; } return result; } protected int getSuggestedMinimumWidth () { return (mBackground == null ) ? mMinWidth : max(mMinWidth, mBackground.getMinimumWidth()); }
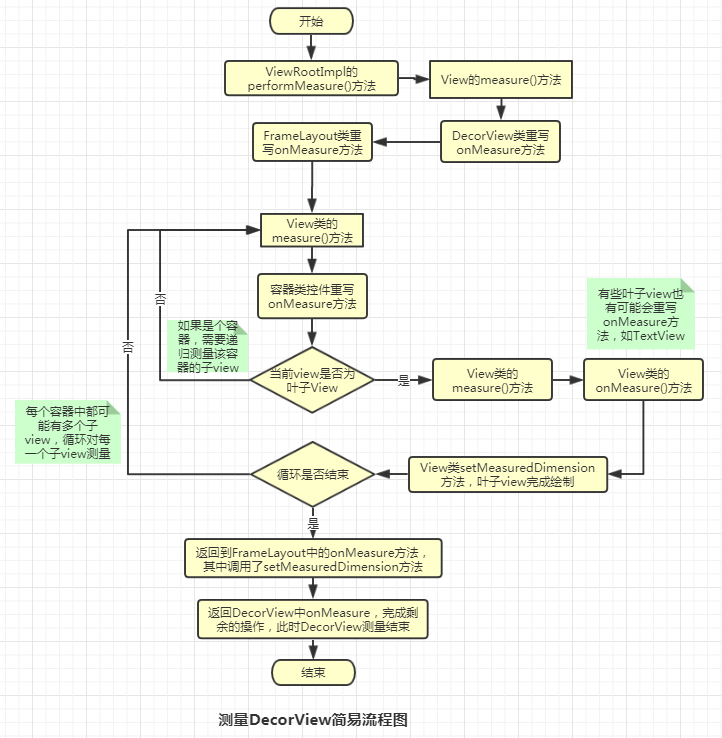
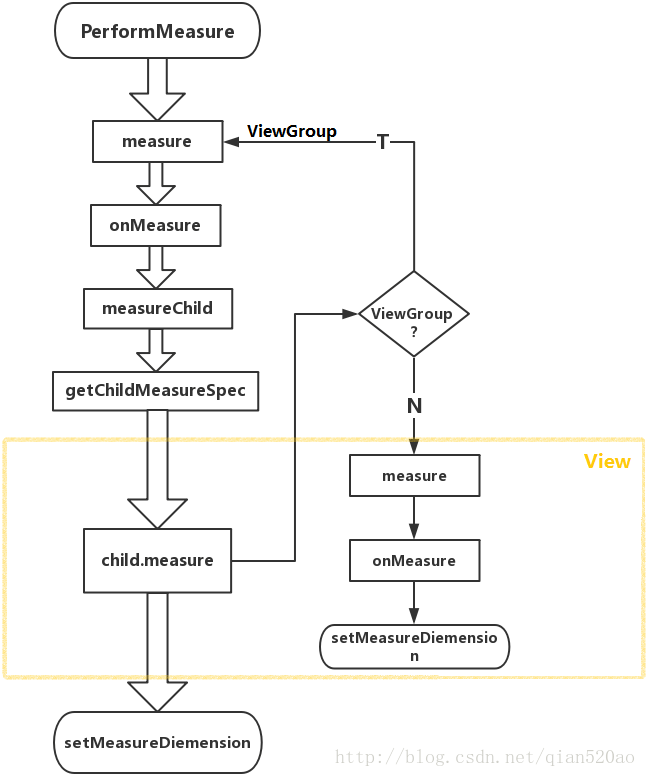
DecorView 从上到下有序的测量 View,遍历 View 树,循环调用 measureChildWithMargins() 方法,在该方法中通过 ViewGroup#getChildMeasureSpec() 方法生成子 View 的 MeasureSpec,并调用 child.measure() 进行 子 View 的测量。遍历完成后,每个视图存储了自己的尺寸大小和测量规格。
从 DecorView 开始 View 树的测量,通过遍历调用 ViewGroup#measureChildWithMargins() 方法,根据父 View 的 MeasureSpec 和 子 View 的 LayoutParams 生成子 View 的 MeasureSpec,并传给子 View 进行 measure 过程。
为什么 Activity#onCreate() 中获取不到 View 的宽高?
View 是在 Activity#onResume() 方法之后才开始绘制流程。
可以通过 View#post() 方法获取 View 的宽高。
1
2
3
4
5
6
7
8
9
10
11
12
13
14
15
16
17
18
19
20
21
22
23
24
25
26
27
28
29
30
31
32
33
34
35
36
37
38
39
public class View { public boolean post (Runnable action) { final AttachInfo attachInfo = mAttachInfo; if (attachInfo != null ) { return attachInfo.mHandler.post(action); } getRunQueue().post(action); return true ; } private HandlerActionQueue getRunQueue () { if (mRunQueue == null ) { mRunQueue = new HandlerActionQueue (); } return mRunQueue; } } public class HandlerActionQueue { private HandlerAction[] mActions; private int mCount; public void post (Runnable action) { postDelayed(action, 0 ); } public void postDelayed (Runnable action, long delayMillis) { final HandlerAction handlerAction = new HandlerAction (action, delayMillis); synchronized (this ) { if (mActions == null ) { mActions = new HandlerAction [4 ]; } mActions = GrowingArrayUtils.append(mActions, mCount, handlerAction); mCount++; } } }
AttachInfo 不为空,调用它的 mHandler 执行;
AttachInfo 为空,保存 Runnable 到 HandlerActionQueue 中。
View.AttachInfo 何时被赋值?
1
2
3
4
5
6
7
8
9
10
11
12
13
14
15
16
17
18
19
20
21
22
23
24
25
26
public final class ViewRootImpl { final View.AttachInfo mAttachInfo; View mView; final ViewRootHandler mHandler = new ViewRootHandler (); public ViewRootImpl (Context context, Display display, ...) { mAttachInfo = new View .AttachInfo(..., this , mHandler, this , context); } public void setView (View view, ...) { mView = view; requestLayout(); view.assignParent(this ); } private void performTraversals () { final View host = mView; if (mFirst) { host.dispatchAttachedToWindow(mAttachInfo, 0 ); } getRunQueue().executeActions(mAttachInfo.mHandler); windowSizeMayChange |= measureHierarchy(host, lp, res, desiredWindowWidth, desiredWindowHeight); } }
ViewRootImpl 实例化时创建了 mAttachInfo 和 mHandler 对象,由于是在主线程创建,使用的是主线程 Looper,所以处理消息也是在主线程;
ViewRootImpl 绑定 DecorView 时会发起绘制流程;
在 View 测量流程之前为所有子 View 的 mAttachInfo 赋值,并执行 HandlerAction。
1
2
3
4
5
6
7
8
9
10
11
12
13
14
15
16
17
18
19
20
21
22
23
24
25
26
public class ViewGroup { @Override void dispatchAttachedToWindow (AttachInfo info, int visibility) { super .dispatchAttachedToWindow(info, visibility); final int count = mChildrenCount; final View[] children = mChildren; for (int i = 0 ; i < count; i++) { final View child = children[i]; child.dispatchAttachedToWindow(info, combineVisibility(visibility, child.getVisibility())); } } } public class View { AttachInfo mAttachInfo; private HandlerActionQueue mRunQueue; void dispatchAttachedToWindow (AttachInfo info, int visibility) { mAttachInfo = info; if (mRunQueue != null ) { mRunQueue.executeActions(info.mHandler); mRunQueue = null ; } } }
host.dispatchAttachedToWindow(mAttachInfo, 0) 方法为 ViewGroup 的所有子 View 的 mAttachInfo 赋值。
执行 HandlerAction:
1 2 3 4 5 6 7 8 9 10 public void executeActions (Handler handler) { synchronized (this ) { final HandlerAction[] actions = mActions; for (int i = 0 , count = mCount; i < count; i++) { final HandlerAction handlerAction = actions[i]; handler.postDelayed(handlerAction.action, handlerAction.delay); } } }
调用 ViewRootImpl.mHandler 向主线程发送消息。
执行 HandlerAction 是在 View 测量流程之前,为什么也可以获取 View 的宽高?
主线程是基于 Handler 消息机制的。主线程先执行 EXECUTE_TRANSACTION 消息,发起 View 绘制流程,确定了 View 的位置或宽高。主线程在测量之前,通过 HandlerAction 向主线程发送了消息,此消息是在 EXECUTE_TRANSACTION 消息之后执行。所以可以获取 View 的宽高。
layout 过程 View 的 layout 过程和 measure 过程类似,也是从顶层 DecorView 开始,递归的确定 View 的四个顶点的坐标的过程。
1 2 3 4 5 6 private void performLayout (WindowManager.LayoutParams lp, int desiredWindowWidth, int desiredWindowHeight) { final View host = mView; host.layout(0 , 0 , host.getMeasuredWidth(), host.getMeasuredHeight()); }
调用 View#layout() 方法。
1 2 3 4 5 6 7 8 public void layout (int l, int t, int r, int b) { boolean changed = isLayoutModeOptical(mParent) ? setOpticalFrame(l, t, r, b) : setFrame(l, t, r, b); if (changed || (mPrivateFlags & PFLAG_LAYOUT_REQUIRED) == PFLAG_LAYOUT_REQUIRED) { onLayout(changed, l, t, r, b); } }
View#OnLayout() 是空方法,ViewGroup#onLayout() 是抽象方法,由子类执行具体的布局逻辑。
1 2 3 4 5 6 7 8 9 10 11 12 13 14 15 @Override protected void onLayout (boolean changed, int left, int top, int right, int bottom) { layoutChildren(left, top, right, bottom, false ); } void layoutChildren (int left, int top, int right, int bottom, boolean forceLeftGravity) { final int count = getChildCount(); for (int i = 0 ; i < count; i++) { final View child = getChildAt(i); if (child.getVisibility() != GONE) { child.layout(childLeft, childTop, childLeft + width, childTop + height); } } }
requestLayout() 当 View 布局比如方向、尺寸变化的时候,会调用该方法,在自定义的视图中,如果某些情况下希望重新测量尺寸大小,应该调用 View#requestLayout() 方法,它会触发 measure 和 layout 过程,但不会进行 draw 过程。
1
2
3
4
5
6
7
8
9
10
11
public void requestLayout () { mPrivateFlags |= PFLAG_FORCE_LAYOUT; mPrivateFlags |= PFLAG_INVALIDATED; if (mParent != null && !mParent.isLayoutRequested()) { mParent.requestLayout(); } }
递归调用父 View 的 requestLayout() 方法,DecorView 的 parent 是 ViewRootImpl。
1 2 3 4 5 6 7 8 9 @Override public void requestLayout () { if (!mHandlingLayoutInLayoutRequest) { checkThread(); mLayoutRequested = true ; scheduleTraversals(); } }
因为设置了 mLayoutRequested = true 标识,所以在 performTraversals() 中调用 performMeasure(),performLayout(),但是由于没有设置 mDirty,所以不会走 performDraw() 流程。
draw 过程 Draw 过程则决定了 View 的显示,只有 draw() 方法完成以后 View 的内容才能呈现在屏幕上。
1
2
3
4
5
6
7
8
9
10
11
12
13
14
15
16
17
public final class ViewRootImpl { private void performDraw () { final boolean fullRedrawNeeded = mFullRedrawNeeded || mReportNextDraw; boolean canUseAsync = draw(fullRedrawNeeded); } private boolean draw (boolean fullRedrawNeeded) { if (!drawSoftware(surface, mAttachInfo, xOffset, yOffset, scalingRequired, dirty, surfaceInsets)) { return false ; } } private boolean drawSoftware (Surface surface, ...) { mView.draw(canvas); } }
1 2 3 4 5 6 7 8 9 10 11 12 13 14 15 16 17 18 19 20 21 22 23 24 25 26 27 28 29 30 31 32 33 34 35 36 37 38 39 40 41 42 43 44 45 46 47 48 49 50 51 52 53 54 55 56 57 58 59 60 61 62 public void draw (Canvas canvas) { drawBackground(canvas); if (!verticalEdges && !horizontalEdges) { onDraw(canvas); dispatchDraw(canvas); drawAutofilledHighlight(canvas); if (mOverlay != null && !mOverlay.isEmpty()) { mOverlay.getOverlayView().dispatchDraw(canvas); } onDrawForeground(canvas); drawDefaultFocusHighlight(canvas); return ; } onDraw(canvas); dispatchDraw(canvas); onDrawForeground(canvas); drawDefaultFocusHighlight(canvas); } protected void onDraw (Canvas canvas) {} protected void dispatchDraw (Canvas canvas) {}
绘制背景;
绘制内容;
绘制子视图;
绘制渐变框;
绘制滚动条。
mView 是 ViewGroup,会遍历子 View 调用 drawChild() 绘制子 View。
1 2 3 4 5 6 7 8 9 10 11 12 13 14 15 16 17 18 19 @Override protected void dispatchDraw (Canvas canvas) { final int childrenCount = mChildrenCount; final View[] children = mChildren; for (int i = 0 ; i < childrenCount; i++) { final int childIndex = getAndVerifyPreorderedIndex(childrenCount, i, customOrder); final View child = getAndVerifyPreorderedView(preorderedList, children, childIndex); if ((child.mViewFlags & VISIBILITY_MASK) == VISIBLE || child.getAnimation() != null ) { more |= drawChild(canvas, child, drawingTime); } } } protected boolean drawChild (Canvas canvas, View child, long drawingTime) { return child.draw(canvas, this , drawingTime); }
invalidate() 和 postInvalidate() invalidate() 和 postInvalidate() 都可以请求 View 的重绘。前者必须在主线程调用,而后者可以在子线程发起重绘请求。只绘制那些调用了invalidate() 方法的 View,如果视图大小没有变化就不会调用 layout 过程。
1 2 3 4 5 6 7 8 9 10 11 12 13 14 15 16 17 18 19 20 21 22 23 24 25 26 27 28 29 30 31 32 33 34 35 36 37 38 39 40 public void invalidate () { invalidate(true ); } @UnsupportedAppUsage public void invalidate (boolean invalidateCache) { invalidateInternal(0 , 0 , mRight - mLeft, mBottom - mTop, invalidateCache, true ); } void invalidateInternal (int l, int t, int r, int b, boolean invalidateCache, boolean fullInvalidate) { if (skipInvalidate()) { return ; } if (...){ final AttachInfo ai = mAttachInfo; final ViewParent p = mParent; if (p != null && ai != null && l < r && t < b) { final Rect damage = ai.mTmpInvalRect; damage.set(l, t, r, b); p.invalidateChild(this , damage); } } } public void postInvalidate () { postInvalidateDelayed(0 ); } public void postInvalidateDelayed (long delayMilliseconds) { final AttachInfo attachInfo = mAttachInfo; if (attachInfo != null ) { attachInfo.mViewRootImpl.dispatchInvalidateDelayed(this , delayMilliseconds); } }
1 2 3 4 5 6 7 8 9 10 11 12 13 14 15 16 17 18 19 20 21 22 public final void invalidateChild (View child, final Rect dirty) { final AttachInfo attachInfo = mAttachInfo; if (attachInfo != null && attachInfo.mHardwareAccelerated) { onDescendantInvalidated(child, child); return ; } ViewParent parent = this ; if (attachInfo != null ) { do { View view = null ; if (parent instanceof View) { view = (View) parent; } parent = parent.invalidateChildInParent(location, dirty); } while (parent != null ); } }
invalidate() 循环调用 parent 的 invalidateChild() 方法,最后执行 ViewRootImpl#invalidateChild()。
1 2 3 4 5 6 7 8 9 10 11 12 13 14 15 16 17 18 19 20 21 22 23 24 25 26 27 @Override public void invalidateChild (View child, Rect dirty) { invalidateChildInParent(null , dirty); } @Override public ViewParent invalidateChildInParent (int [] location, Rect dirty) { checkThread(); invalidateRectOnScreen(dirty); return null ; } private void invalidateRectOnScreen (Rect dirty) { final Rect localDirty = mDirty; localDirty.union(dirty.left, dirty.top, dirty.right, dirty.bottom); if (!mWillDrawSoon && (intersected || mIsAnimating)) { scheduleTraversals(); } } public void dispatchInvalidateDelayed (View view, long delayMilliseconds) { Message msg = mHandler.obtainMessage(MSG_INVALIDATE, view); mHandler.sendMessageDelayed(msg, delayMilliseconds); }
invalidate() 方法将其需要重绘的区域沿着控件树自下而上的交给 ViewRootImpl,并保存在 ViewRootImpl.mDirty 成员中,最后通过 scheduleTraversals() 触发一次重绘过程。
postInvalidate() 方法会向 ViewRootImpl#ViewRootHandler 发送 MSG_INVALIDATE 消息,执行 ((View) msg.obj).invalidate() 方法,接着同 invalidate() 过程。
当多次调用 invalidate() 方法会使得 ViewRootImpl 多次接收到设置脏区域的请求,ViewRootImpl 会将这些脏区域累加到 mDirty 中,进而在随后的遍历中,一次性的完成所有脏区域的重绘。
窗口第一次绘制时候,ViewRootImpl 的 mFullRedrawNeeded 成员将会被设置为 true,也就是说 mDirty 所描述的区域将会扩大到整个窗口,进而实现完整重绘。
View#invalidate() 方法最终会调用 ViewRootImpl#scheduleTraversals() 方法,但 measure 和 layout 过程需要时才会执行,避免不必要的操作,提高效率。
setEnable()、setSelected()、setVisibility() 都会间接调用到 invalidate() 来请求重绘。
setWillNotDraw() 1 2 3 4 5 6 7 8 9 10 11 12 13 14 15 16 17 18 19 20 21 22 23 24 25 26 27 28 29 public class View { public void setWillNotDraw (boolean willNotDraw) { setFlags(willNotDraw ? WILL_NOT_DRAW : 0 , DRAW_MASK); } public void draw (Canvas canvas) { dispatchDraw(canvas); } boolean draw (Canvas canvas, ViewGroup parent, long drawingTime) { if ((mPrivateFlags & PFLAG_SKIP_DRAW) == PFLAG_SKIP_DRAW) { mPrivateFlags &= ~PFLAG_DIRTY_MASK; dispatchDraw(canvas); } else { draw(canvas); } } } public class ViewGroup { private void initViewGroup () { if (!isShowingLayoutBounds()) { setFlags(WILL_NOT_DRAW, DRAW_MASK); } } }
ViewGroup 默认情况下启用 WILL_NOT_DRAW 标志位,不进行绘制,因为是容器,本身不绘制任何东西。
总结
界面上任何一个 View 的 invalidate() 请求最终都会走到 ViewRootImpl#scheduleTraversals(),安排一次遍历绘制 View 树的任务;
ViewRootImpl#scheduleTraversals() 会先过滤掉同一帧内的重复调用,同一帧内只需要安排一次遍历绘制 View 树的任务。这个任务会在下一个屏幕刷新信号到来时调用 performTraversals() 遍历 View 树,遍历过程中会将所有需要刷新的 View 进行重绘;
ViewRootImpl#scheduleTraversals() 会往主线程的消息队列中发送一个同步屏障,拦截这个时刻之后所有的同步消息的执行,尽可能优先处理遍历绘制 View 树的工作;
绘制任务封装成 TraversalRunnable,通过 Choreographer#postCallback() 添加到 CALLBACK_TRAVERSAL 类型的链表中等待执行;
App 通过 Native 方法注册一个屏幕刷新信号的监听,当下一个屏幕刷新信号发出时,底层就会回调 Choreographer#onVsync() 方法;
onVsync() 方法被回调时会发送一个切换到主线程的异步消息,来执行 doFrame() 方法;
doFrame() 方法遍历链表中的任务来执行,比如 ViewRootImpl#doTraversal() 任务;
如果是绘制任务,就会执行 performMeasure()、perfromLayout()和 performDraw() 进行测量,布局和绘制操作。
参考 [1] 官方文档 [2] Android View 的绘制流程 [3] Android View 的工作流程