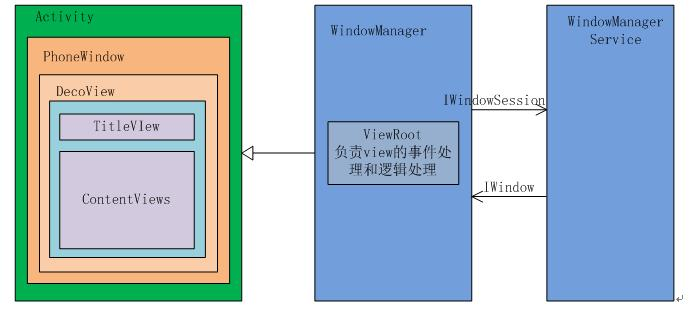
Android 中所有的视图都是通过 Window 来呈现的,像常用的 Activity,Dialog 和 Toast 都是附加在 Window 上的,所以 Window 是 View 的直接管理者 。
Window 是个抽象概念,每一个 Window 对应着一个 ViewRootImpl,Window 通过 ViewRootImpl 来和 View 建立联系。View 是 Window 存在的实体,只能通过 WindowManager 访问 Window。
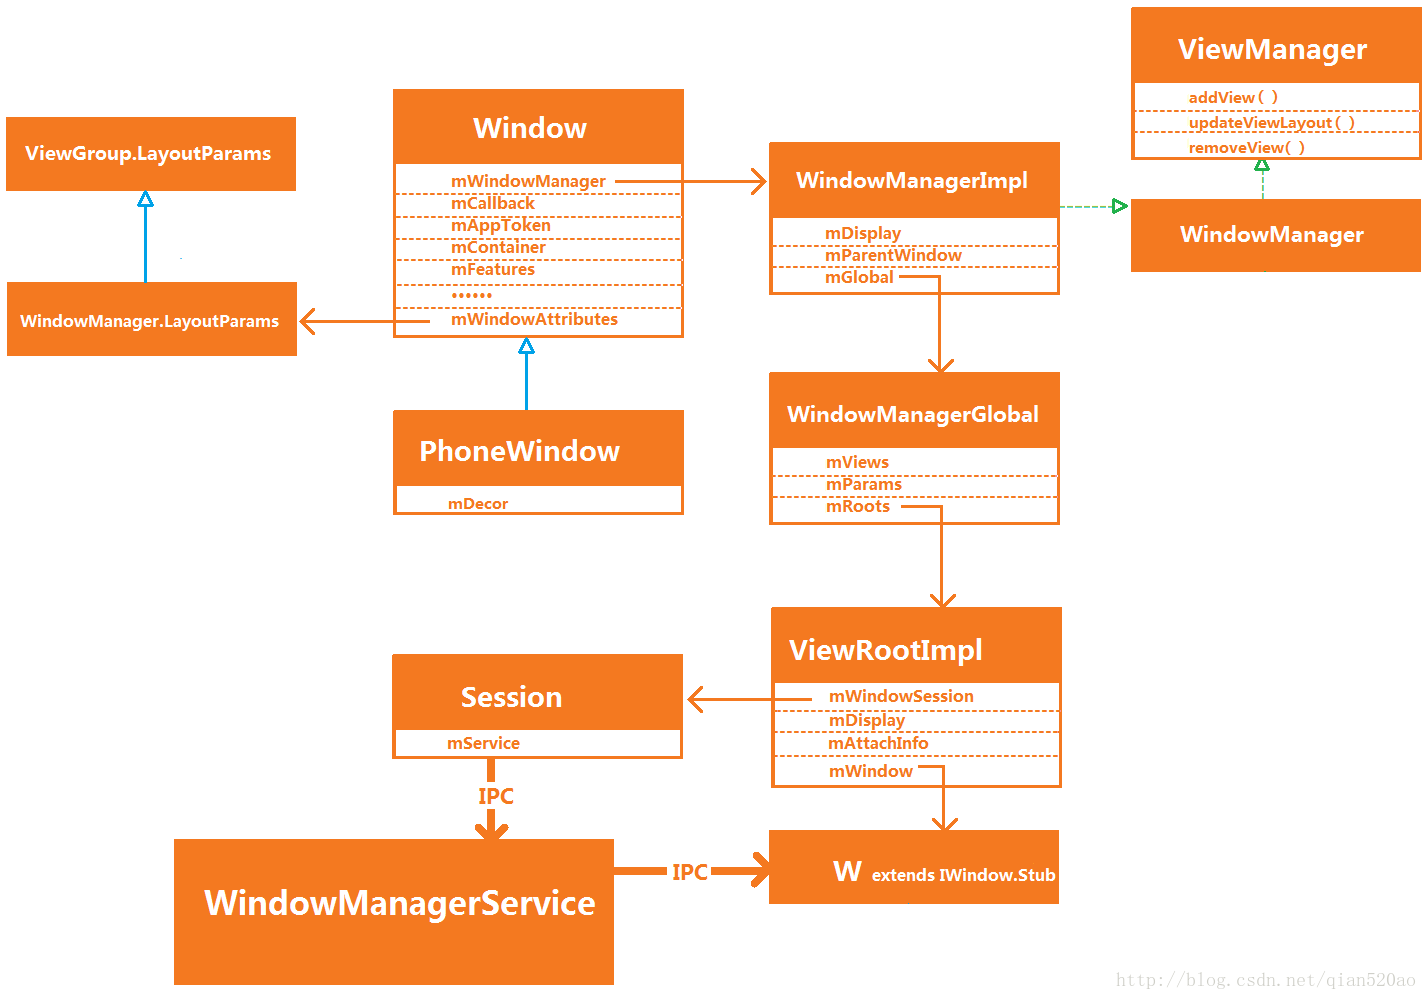
WindowManager 是一个接口,继承 ViewManager 接口。主要用来管理窗口的一些状态、属性,View 的添加、删除、更新、消息收集和处理等。其唯一实现类是 WindowManagerImpl,WindowManagerImpl 又委托给了 WindowManagerGlobal。WindowManagerGlobal 中存储着四个 List,分别是 mViews,mRoots,mParams,mDyingViews。单例模式。Window 的操作通过 IPC 通信交给 WindowManagerService 操作。
Window 相关类
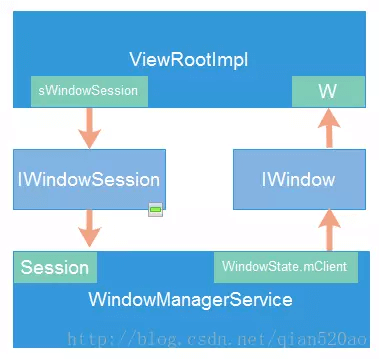
Window: 是一个抽象类,提供了统一的外观和行为标准。作为顶级视图添加到 WindowManager 中,View 是依附于 Window 而存在的,对 View 进行管理。View 是 window 的存在形式,window 是 view 的载体PhoneWindow: Window 的唯一实现类。Activity,Toast 和 Dialog 都包含 PhoneWindow 对象,PopupWindow 。WindowManager: 是一个接口,继承了 ViewManager(addView,updateViewLayout 和 removeView 方法) 接口,对 Window 进行管理。实现类是 WindowManagerImpl。WindowManagerGlobal: 单例模式。对 Window 的操作都通过它代理执行。ViewRootImpl: 实现了 ViewParent 接口,是 Window 和 DecorView 的桥梁,类似 ActivityThread 和 AMS 通信一样。内部类 W 是一个 Binder 对象,它通静态变量 sWindowSession(Session 实例 与 WMS 进行通信。绘制 View 和 事件传递。
Activity 是控制器。Window 是承载器,承载视图。DecorView 是顶层视图,负责视图部分。ViewRoot 是连接器,负责用户和 WMS 的交互。
Window LayoutParams 1 2 3 4 5 6 7 8 9 10 11 12 13 14 15 16 17 18 19 20 21 22 23 24 25 26 27 28 29 public static class LayoutParams extends ViewGroup .LayoutParams implements Parcelable { public static final int FIRST_APPLICATION_WINDOW = 1 ; public static final int TYPE_BASE_APPLICATION = 1 ; public static final int LAST_APPLICATION_WINDOW = 99 ; public static final int FIRST_SUB_WINDOW = 1000 ; public static final int LAST_SUB_WINDOW = 1999 ; public static final int FIRST_SYSTEM_WINDOW = 2000 ; public static final int LAST_SYSTEM_WINDOW = 2999 ; public int x; public int y; public int type; public int flags; public IBinder token = null ; }
Window Type Window 有三种类型,分别是应用 Window、子Window、系统 Window。
应用窗口:
Activity 对应的窗口类型是应用窗口, 所有 Activity 默认的窗口类型是 TYPE_BASE_APPLICATION。 WindowManager 的 LayoutParams 的默认类型是 TYPE_APPLICATION。 Dialog 并没有设置 type,所以也是默认的窗口类型即 TYPE_APPLICATION。
子窗口:
子窗口不能单独存在,它需要附属在父 Window 中,比如 PopupWindow 或 Dialog。
系统窗口:
一般来讲,系统窗口应该由系统来创建的,例如 ANR 时的提示框,系统状态栏,屏保等。但是,Framework 还是定义了一些,可以被应用所创建的系统窗口,如 TYPE_APPLICATION_OVERLAY。系统窗口需要相应的权限。
常量值
类型
FIRST_APPLICATION_WINDOW=1
第一个普通应用窗口
TYPE_BASE_APPLICATION=1
所有程序窗口的 base 窗口,其他应用程序窗口都显示在它上面
TYPE_APPLICATION=2
普通应用程序窗口,token 必须设置为 Activity 的 token 来指定窗口属于谁
TYPE_APPLICATION_STARTING=3
应用程序启动时先显示此窗口,当真正的窗口配置完成后,关闭此窗口
LAST_APPLICATION_WINDOW=99
最后一个应用窗口
FIRST_SUB_WINDOW = 1000
第一个子 Window
LAST_SUB_WINDOW = 1999
最后一个子 Window
FIRST_SYSTEM_WINDOW=2000
第一个系统窗口
TYPE_STATUS_BAR=2000
状态栏,只能有一个状态栏,位于屏幕顶端
TYPE_SYSTEM_DIALOG=2008
系统对话框
TYPE_INPUT_METHOD=2011
输入法窗口,显示于普通应用/子窗口之上
TYPE_APPLICATION_OVERLAY=2038
应用弹窗
LAST_SYSTEM_WINDOW=2999
最后一个系统窗口
注意:
Window Flag Window 属性用来控制 Window 的显示特性,这里主要介绍几个比较常用的选项:
Window 类型和标记通过 WindowManager.LayoutParams 设置:
1 2 3 4 5 6 7 public static class LayoutParams extends ViewGroup .LayoutParams implements Parcelable { public LayoutParams () { super (LayoutParams.MATCH_PARENT, LayoutParams.MATCH_PARENT); type = TYPE_APPLICATION; format = PixelFormat.OPAQUE; } }
Window Token 在源码中 token 一般代表的是 Binder 对象,用于 IPC 通讯。并且它也包含着此次通讯所需要的信息,在 ViewRootImpl 里,token 用来表示 mWindow(W 类,即 IWindow),并且在 WMS 中只有符合要求的 token 才能让 Window 正常显示。
在 Window 中,token(LayoutParams.token)分为以下 2 种情况:
应用窗口 : 表示的是 activity 的 mToken
子窗口 : 表示的是父窗口的 W 对象,也就是 mWindow(IWindow)
Window 添加 View 的过程 1 2 3 4 5 public void setContentView (@LayoutRes int layoutResID) { getWindow().setContentView(layoutResID); initWindowDecorActionBar(); }
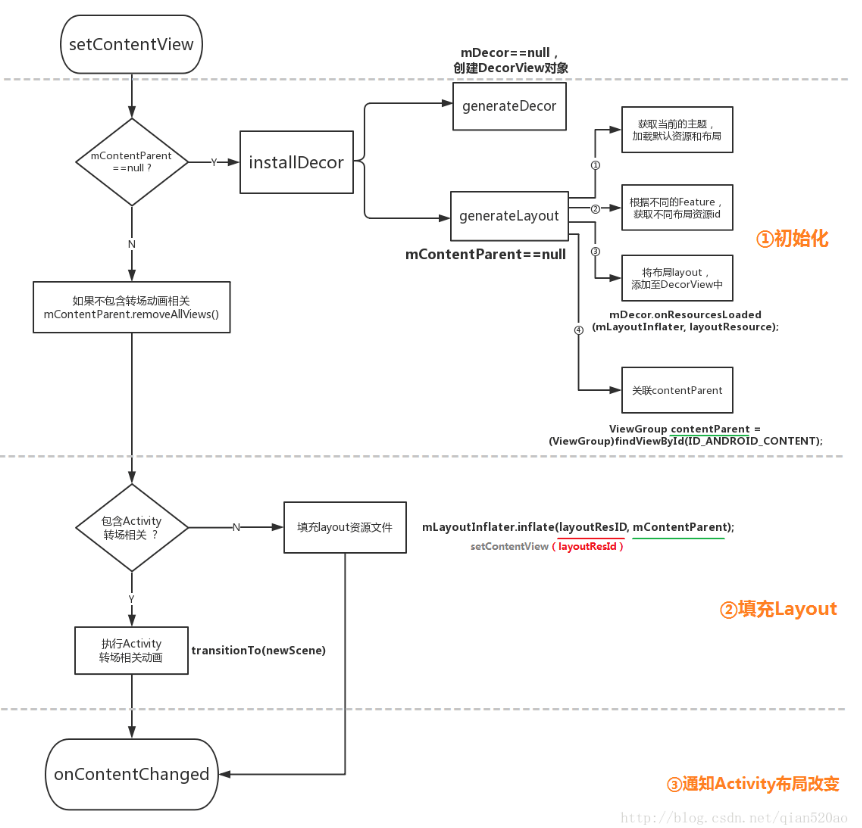
1 2 3 4 5 6 7 8 9 10 11 12 13 14 15 16 17 18 19 20 21 22 23 24 25 26 27 28 29 30 31 32 33 34 35 36 37 38 39 40 41 42 43 44 45 46 47 48 49 50 51 52 53 54 55 56 57 58 59 60 61 62 63 64 65 66 67 68 69 70 71 72 73 74 75 76 77 78 79 80 81 82 public class PhoneWindow extends Window implements MenuBuilder .Callback { private DecorView mDecor; ViewGroup mContentParent; public void setContentView (int layoutResID) { if (mContentParent == null ) { installDecor(); } else if (!hasFeature(FEATURE_CONTENT_TRANSITIONS)) { mContentParent.removeAllViews(); } if (hasFeature(FEATURE_CONTENT_TRANSITIONS)) { final Scene newScene = Scene.getSceneForLayout(mContentParent, layoutResID, getContext()); transitionTo(newScene); } else { mLayoutInflater.inflate(layoutResID, mContentParent); } mContentParent.requestApplyInsets(); final Callback cb = getCallback(); if (cb != null && !isDestroyed()) { cb.onContentChanged(); } mContentParentExplicitlySet = true ; } private void installDecor () { if (mDecor == null ) { mDecor = generateDecor(-1 ); } else { mDecor.setWindow(this ); } if (mContentParent == null ) { mContentParent = generateLayout(mDecor); } } protected DecorView generateDecor (int featureId) { return new DecorView (context, featureId, this , getAttributes()); } protected ViewGroup generateLayout (DecorView decor) { TypedArray a = getWindowStyle(); WindowManager.LayoutParams params = getAttributes(); int layoutResource; int features = getLocalFeatures(); if (features & xxx != 0 ){ layoutResource = R.layout.xxx; } else { layoutResource = R.layout.screen_simple; } mDecor.onResourcesLoaded(mLayoutInflater, layoutResource); ViewGroup contentParent = (ViewGroup)findViewById(ID_ANDROID_CONTENT); mDecor.finishChanging(); return contentParent; } }
1 2 3 4 5 6 7 8 9 10 11 void onResourcesLoaded (LayoutInflater inflater, int layoutResource) { mDecorCaptionView = createDecorCaptionView(inflater); final View root = inflater.inflate(layoutResource, null ); if (mDecorCaptionView != null ) { } else { addView(root, 0 , new ViewGroup .LayoutParams(MATCH_PARENT, MATCH_PARENT)); } mContentRoot = (ViewGroup) root; }
1 2 3 4 5 6 7 8 9 10 11 12 13 14 15 16 17 18 19 20 <LinearLayout xmlns:android ="http://schemas.android.com/apk/res/android" android:layout_width ="match_parent" android:layout_height ="match_parent" android:fitsSystemWindows ="true" android:orientation ="vertical" > <ViewStub android:id ="@+id/action_mode_bar_stub" android:inflatedId ="@+id/action_mode_bar" android:layout ="@layout/action_mode_bar" android:layout_width ="match_parent" android:layout_height ="wrap_content" android:theme ="?attr/actionBarTheme" /> <FrameLayout android:id ="@android:id/content" android:layout_width ="match_parent" android:layout_height ="match_parent" android:foregroundInsidePadding ="false" android:foregroundGravity ="fill_horizontal|top" android:foreground ="?android:attr/windowContentOverlay" /> </LinearLayout >
首次调用 Activity#setContentView() 时通过 installDecor() 方法初始化 mDecor 和 mContentParent(R.id.content) 对象。
generateDecor() 创建 DecorView 对象。
generateLayout(mDecor) 填充布局。首先根据当前的主题设置相关 feature,获取布局文件(默认为 screen_simple.xml),然后将布局添加到 DecorView 中,并将 mContentParent 与布局中 id=R.id.content 的 FrameLayout 绑定。
如果设置了 FEATURE_CONTENT_TRANSITIONS,就会创建 Scene 完成转场动画;否则使用布局填充器将布局文件填充至 mContentParent。Activity 的布局文件也就添加到 DecorView 里面了。
Window 的创建过程 Activity 通过 ClassLoader 实例化后调用 Activity#attach() 方法,在该方法中创建 PhoneWindow 对象。
1 2 3 4 5 6 7 public final class ActivityThread extends ClientTransactionHandler { private Activity performLaunchActivity (ActivityClientRecord r, Intent customIntent) { activity.attach(appContext, this , getInstrumentation(), ...); mInstrumentation.callActivityOnCreate(activity, r.state); } }
通过 AMS 启动 Activity,回调 performLaunchActivity() 方法。
1 2 3 4 5 6 7 8 9 10 11 12 13 14 15 16 17 18 19 20 21 22 23 24 25 26 27 28 29 30 31 32 33 public class Activity extends ContextThemeWrapper implements Window .Callback, Window.OnWindowDismissedCallback ...{ private Thread mUiThread; ActivityThread mMainThread; private IBinder mToken; private Window mWindow; private WindowManager mWindowManager; final void attach (Context context, ActivityThread aThread, IBinder token,...) { mWindow = new PhoneWindow (this , window, activityConfigCallback); mWindow.setCallback(this ); mWindow.setOnWindowDismissedCallback(this ); mMainThread = aThread; mToken = token; mWindow.setWindowManager( (WindowManager)context.getSystemService(Context.WINDOW_SERVICE), mToken, ...); mWindowManager = mWindow.getWindowManager(); } @Override public Object getSystemService (@ServiceName @NonNull String name) { if (WINDOW_SERVICE.equals(name)) { return mWindowManager; } else if (SEARCH_SERVICE.equals(name)) { ensureSearchManager(); return mSearchManager; } return super .getSystemService(name); } }
在 Activity#onCreate() 方法里,我们通过 setContentView() 将 view 添加到 PhoneWindow 的 mContentParent(R.id.content) 中,也就是将资源布局文件和 PhoneWindow 关联。虽然 Window 和 DecorView 已经创建并初始化完毕,但这个时候的 DecorView 还没有被 WindowManager 添加到 Window 中。
Window 的添加过程 PhoneWindow 只是负责处理一些应用窗口通用的逻辑(设置标题栏,导航栏等)。真正完成把一个 View 作为窗口添加到 WMS 的过程是由 WindowManager 来完成的。
1 2 3 4 5 6 7 8 9 10 11 12 13 14 15 16 17 18 19 20 21 22 23 24 25 26 27 28 29 30 31 32 33 34 35 public void handleResumeActivity (IBinder token, ...) { final ActivityClientRecord r = performResumeActivity(token, ...); final Activity a = r.activity; if (r.window == null && !a.mFinished && willBeVisible) { r.window = r.activity.getWindow(); View decor = r.window.getDecorView(); decor.setVisibility(View.INVISIBLE); ViewManager wm = a.getWindowManager(); WindowManager.LayoutParams l = r.window.getAttributes(); a.mDecor = decor; l.type = WindowManager.LayoutParams.TYPE_BASE_APPLICATION; if (a.mVisibleFromClient) { if (!a.mWindowAdded) { a.mWindowAdded = true ; wm.addView(decor, l); } } } if (!r.activity.mFinished && willBeVisible && r.activity.mDecor != null && !r.hideForNow) { if (r.activity.mVisibleFromClient) { r.activity.makeVisible(); } } }
通过 WindowManagerImpl 将 DecorView 添加到窗口上 wm.addView(decor, l),又交给了 WindowManagerGlobal 添加。
1 2 3 4 5 6 7 8 9 10 11 12 13 14 15 16 17 18 19 20 21 22 23 24 25 26 27 28 29 30 31 32 33 34 35 36 37 38 39 40 41 42 43 44 45 46 47 48 49 50 51 52 53 54 55 56 57 58 59 60 61 62 63 64 65 66 67 public final class WindowManagerGlobal { private static IWindowManager sWindowManagerService; private static IWindowSession sWindowSession; public void addView (View view, ViewGroup.LayoutParams params, Display display, Window parentWindow, int userId) { if (parentWindow != null ) { parentWindow.adjustLayoutParamsForSubWindow(wparams); } ViewRootImpl root; View panelParentView = null ; synchronized (mLock) { if (wparams.type >= WindowManager.LayoutParams.FIRST_SUB_WINDOW && wparams.type <= WindowManager.LayoutParams.LAST_SUB_WINDOW) { final int count = mViews.size(); for (int i = 0 ; i < count; i++) { if (mRoots.get(i).mWindow.asBinder() == wparams.token) { panelParentView = mViews.get(i); } } } root = new ViewRootImpl (view.getContext(), display); view.setLayoutParams(wparams); mViews.add(view); mRoots.add(root); mParams.add(wparams); root.setView(view, wparams, panelParentView, userId); } } public static IWindowManager getWindowManagerService () { synchronized (WindowManagerGlobal.class) { if (sWindowManagerService == null ) { sWindowManagerService = IWindowManager.Stub.asInterface( ServiceManager.getService("window" )); } return sWindowManagerService; } } public static IWindowSession getWindowSession () { synchronized (WindowManagerGlobal.class) { if (sWindowSession == null ) { IWindowManager windowManager = getWindowManagerService(); sWindowSession = windowManager.openSession( new IWindowSessionCallback .Stub() { @Override public void onAnimatorScaleChanged (float scale) { ValueAnimator.setDurationScale(scale); } }); } return sWindowSession; } } }
接着通过 ViewRootImpl#setView() 设置 DecorView。
1 2 3 4 5 6 7 8 9 10 11 12 13 14 15 16 17 18 19 20 21 22 23 24 25 26 27 28 29 30 31 32 33 34 35 36 37 38 39 40 41 42 43 44 45 46 47 48 49 50 51 52 53 54 55 56 57 58 59 60 61 62 63 public final class ViewRootImpl implements ViewParent ...{ final IWindowSession mWindowSession; final View.AttachInfo mAttachInfo; public ViewRootImpl (Context context, Display display) { this (context, display, WindowManagerGlobal.getWindowSession(), false ); } public ViewRootImpl (Context context, Display display, IWindowSession session, boolean useSfChoreographer) { mWindowSession = session; mWindow = new W (this ); mAttachInfo = new View .AttachInfo(mWindowSession, mWindow ...); } public void setView (View view, WindowManager.LayoutParams attrs, ...) { mView = view; mAdded = true ; requestLayout(); int res = mWindowSession.addToDisplayAsUser(mWindow, ...) if (res < WindowManagerGlobal.ADD_OKAY) { switch (res) { case WindowManagerGlobal.ADD_BAD_APP_TOKEN: case WindowManagerGlobal.ADD_BAD_SUBWINDOW_TOKEN: throw new WindowManager .BadTokenException( "Unable to add window -- token " + attrs.token + " is not valid; is your activity running?" ); case WindowManagerGlobal.ADD_DUPLICATE_ADD: throw new WindowManager .BadTokenException( "Unable to add window -- window " + mWindow + " has already been added" ); case WindowManagerGlobal.ADD_PERMISSION_DENIED: throw new WindowManager .BadTokenException("Unable to add window " + mWindow + " -- permission denied for window type " + mWindowAttributes.type); case WindowManagerGlobal.ADD_INVALID_TYPE: throw new WindowManager .InvalidDisplayException("Unable to add window " + mWindow + " -- the specified window type " + mWindowAttributes.type + " is not valid" ); ... } throw new RuntimeException ( "Unable to add window -- unknown error code " + res); } view.assignParent(this ); } static class W extends IWindow .Stub { @Override public void insetsChanged (InsetsState insetsState) {} } }
mWindowSession 通过 WindowManagerGlobal.getWindowSession() 方法获取,是一个 Binder 对象。因为 WindowManagerGlobal 是单例,所以 mWindowSession 对象每个进程只有一个。
1 2 3 4 5 6 7 8 9 10 11 12 13 class Session extends IWindowSession .Stub implements IBinder .DeathRecipient { public Session (WindowManagerService service, IWindowSessionCallback callback) {} @Override public int addToDisplayAsUser (IWindow window, ...) { return mService.addWindow(this , window, seq, ...); } }
每一个 Session 在 WidowManagerService 里代表一个与应用进程打开的会话连接,每个进程只有一个 Session 对象。最终 Session 通过 IPC 通信,请求 WMS 添加 Window,并由 W 类接收通知。
1 2 3 4 5 6 7 8 9 10 11 12 13 14 15 16 17 18 19 20 21 22 23 24 25 26 27 28 29 30 31 32 33 34 public class WindowManagerService extends IWindowManager .Stub...{ final ArraySet<Session> mSessions = new ArraySet <>(); final HashMap<IBinder, WindowState> mWindowMap = new HashMap <>(); WindowManagerPolicy mPolicy; public int addWindow (Session session, IWindow client, ...) { int res = mPolicy.checkAddPermission(attrs.type, ...); if (res != WindowManagerGlobal.ADD_OKAY) { return res; } if (type >= FIRST_SUB_WINDOW && type <= LAST_SUB_WINDOW) { } final WindowState win = new WindowState (this , session, client, token, ...); if (type == TYPE_TOAST) { mH.sendMessageDelayed( mH.obtainMessage(H.WINDOW_HIDE_TIMEOUT, win), win.mAttrs.hideTimeoutMilliseconds); } res = WindowManagerGlobal.ADD_OKAY; win.attach(); mWindowMap.put(client.asBinder(), win); return res } }
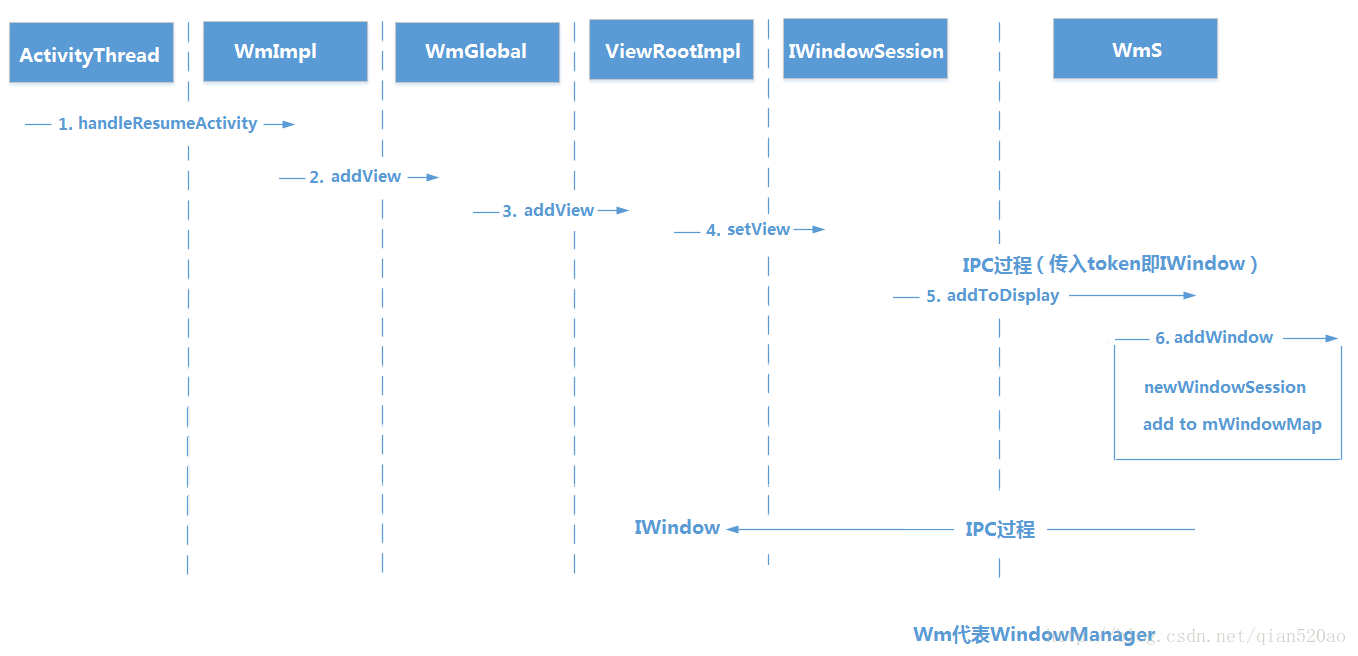
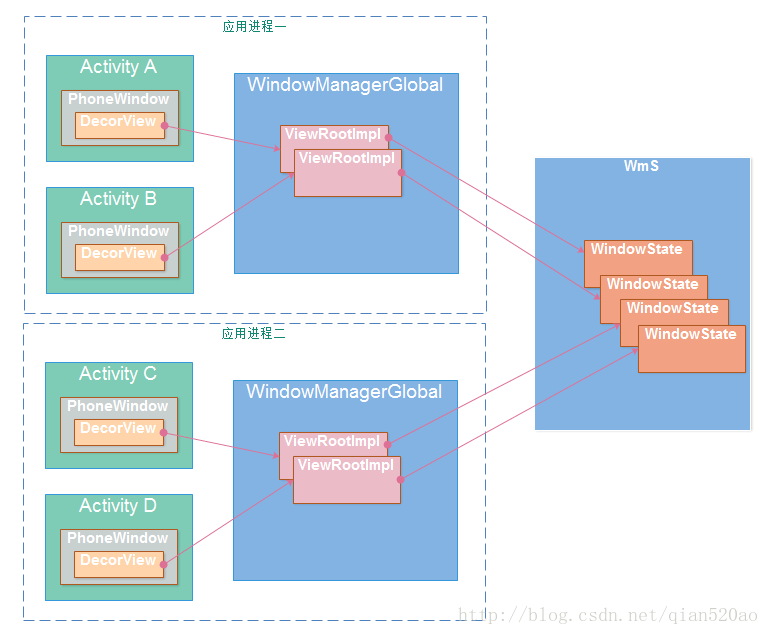
Window 的添加请求就交给 WMS 去处理了,在 WMS 内部会为每一个应用保留一个单独的 Session,同时会创建一个 WindowState 对象来表示当前添加的窗口。
Window 添加流程图如下:
1 2 3 4 5 6 7 8 9 10 11 12 13 14 15 16 17 18 19 20 21 22 23 24 25 26 27 28 29 30 31 32 33 34 35 36 37 38 39 40 41 42 43 44 45 46 47 48 49 50 51 52 53 54 55 56 57 58 59 60 61 62 63 64 65 66 67 68 69 70 71 72 73 74 public class PopupWindow { public PopupWindow (Context context, AttributeSet attrs, ...) { mContext = context; mWindowManager = (WindowManager) context.getSystemService(Context.WINDOW_SERVICE); } public void setContentView (View contentView) { if (isShowing()) { return ; } mContentView = contentView; } public void showAsDropDown (View anchor, int xoff, int yoff, int gravity) { if (isShowing() || !hasContentView()) { return ; } attachToAnchor(anchor, xoff, yoff, gravity); final WindowManager.LayoutParams p = createPopupLayoutParams(anchor.getApplicationWindowToken()); preparePopup(p); final boolean aboveAnchor = findDropDownPosition(anchor, ...); updateAboveAnchor(aboveAnchor); invokePopup(p); } private void preparePopup (WindowManager.LayoutParams p) { if (mContentView == null || mContext == null || mWindowManager == null ) { throw new IllegalStateException ("You must specify a valid content view by " + "calling setContentView() before attempting to show the popup." ); } mDecorView = createDecorView(mBackgroundView); } private PopupDecorView createDecorView (View contentView) { final PopupDecorView decorView = new PopupDecorView (mContext); decorView.addView(contentView, MATCH_PARENT, height); return decorView; } private void invokePopup (WindowManager.LayoutParams p) { final PopupDecorView decorView = mDecorView; mWindowManager.addView(decorView, p); } public void dismiss () { if (!isShowing() || isTransitioningToDismiss()) { return ; } dismissImmediate(decorView, contentHolder, contentView); detachFromAnchor(); if (mOnDismissListener != null ) { mOnDismissListener.onDismiss(); } } private class PopupDecorView extends FrameLayout {} }
创建 PopupWindow,设置 ContentView 等其他属性。
调用 showAtLocation() 或 showAsDropDown() 方法,通过 WindowManager 添加 View。
注意:PopupWindow 并没有创建 PhoneWindow 对象。它和 Activity 在同一层级,不会在 Activity 上方。
Dialog 中的 Window 1 2 3 4 5 6 7 8 9 10 11 12 13 14 15 16 17 18 19 20 21 22 23 24 25 26 27 28 29 30 31 32 33 34 35 36 37 38 39 40 41 42 43 44 45 46 public class Dialog implements DialogInterface , Window.Callback, KeyEvent.Callback, OnCreateContextMenuListener, Window.OnWindowDismissedCallback { Dialog(@NonNull Context context, @StyleRes int themeResId,...) { mWindowManager = (WindowManager) context.getSystemService(Context.WINDOW_SERVICE); final Window w = new PhoneWindow (mContext); mWindow = w; w.setCallback(this ); w.setOnWindowDismissedCallback(this ); w.setOnWindowSwipeDismissedCallback(() -> { if (mCancelable) { cancel(); } }); w.setWindowManager(mWindowManager, null , null ); w.setGravity(Gravity.CENTER); mListenersHandler = new ListenersHandler (this ); } public void setContentView (@NonNull View view) { mWindow.setContentView(view); } public void show () { if (mShowing) { if (mDecor != null ) { mDecor.setVisibility(View.VISIBLE); } return ; } mCanceled = false ; dispatchOnCreate(null ); onStart(); mDecor = mWindow.getDecorView(); WindowManager.LayoutParams l = mWindow.getAttributes(); mWindowManager.addView(mDecor, l); mShowing = true ; sendShowMessage(); } private static final class ListenersHandler extends Handler {} }
Dialog 是子窗口,依赖 Activity,需要 Activity 的 token,如果传递 ApplicationContext 会报 android.view.WindowManager$BadTokenException: Unable to add window -- token null is not valid; is your activity running? 错误。
总结
在 Window 系统中,分为两部分的内容:一部分是运行在系统服务进程的 WMS 及相关类,WMS 用 WindowState 来描述一个窗口;另一部分是运行在应用进程的 WindowManagerImpl, WindowManagerGlobal,ViewRootImpl 等相关类。
对于 WMS 来讲,窗口对应一个 View 对象,而不是 Window 对象。
Window 是抽象类,描述是一类具有某种通用特性的窗口,唯一实现类是 PhoneWindow。PhoneWindow 类把一些操作的统一处理了,例如长按,按”Back”键等。
Android Framework 把窗口分为三种类型,应用窗口,子窗口以及系统窗口。不同类型的窗口在执行添加窗口操作时,对于 WindowManager.LayoutParams 的 token 参数有不同的要求。
只能通过 Context.getSystemServer() 来获取 WindowManager。Activity 返回 mWindowManager,即 WindowManagerImpl。
在调用 WindowManagerImpl 的 addView 之前,如果没有给 token 赋值,则会走默认的 token 赋值逻辑。
参考 [1] Android Window 机制探索 [2] Android 窗口创建流程